Search This Blog

Thursday, May 31, 2012

The Spring Event 2012

A couple of weeks ago I joined my friends in a module setup in the gym of a members church.
Much fun was had, many stories were told, new friends were made and little sleep was endured.
I look forward to next year. Anyway here are a few photos I took while there.


 Above is a shot of a fairly full 10th street yard. The lighting was as room lighting with my camera set to 'Landscape' for the exposure and shutter speed. It looks a bit like a cloudy day in the big city.

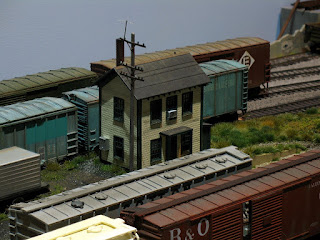
A close-up of the yard office, I think I need some pigeons in the roof.

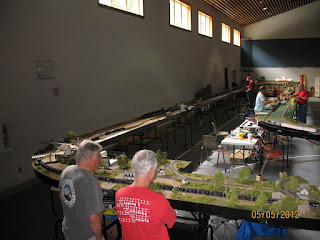
Below are 4 images of the layout. The total size was about 45'x78'. Unfortunately we are running out of room and will have to start being choosy about which modules will be set up. The group I belong to has about 60 LF of additional modules under construction.

Anybody got a warehouse we could borrow for a long weekend?


Sunday, May 13, 2012

The pier crane

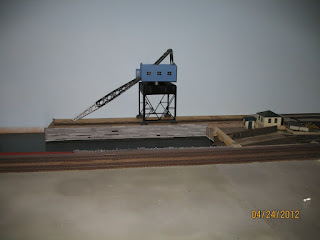
I finally found an out of production Walthers Pier w/crane, I have had this idea that the crane would fit nicely on the smaller pier. The crane kit design turned out to be another collection of "Walthers" compromises which means I'll have to add to it just to make it look reasonable.

 In the above photo we have the lower superstructure assembled with the box it came in.


 I'm going to pick on Walthers here. On this kit the space below the crane platform is wide open, the only support structures are on the edges. The support structures are modeled as plate girders on the front and back, and trusses on the sides, thats all. Now I'm no structural engineer, but even I can see that the crane platform would not be built like this, there has to be some sort of structure in the middle. So here is what I did, I only need to make the model look like it has more structure beneath the deck. The white styrene is what I added to achieve this.


As you can see from this view, you will no longer be able to look straight through the upper part of the superstructure. 

Here is how it looks painted, not to bad. I still have to run the cables and weather the entire structure. Above,  I have the crane placed on the pier as intended, however the overall effect is not what I wanted. For some reason I got it in my head that the crane was smaller that this in proportion to the pier. In reality the pier is to small for this crane so the crane goes in a box till I have a module with a bigger pier.

O well....

Saturday, April 28, 2012

Tugboat Bethlehem part 1

I have been working on this Walthers tugboat kit a little at a time for a few weeks' so here is where I am so far.

 This is how the parts will fit when finished. No painting has been done. I still have a bunch pf parts to assemble first. I'm thinking of painting and detailing the bridge. With all those windows, I'd feel bad about seeing an empty space in there. This is my first marine kit so I'm taking my time and following an article in the publication "Transfer" on building on of these.


 I have added more freeboard to the bow per the article mentioned above. I haven't been worried about the fit of the rubbing strakes to the stem at the bow because the plate that holds on the bumper will cover the bow.

Sunday, April 15, 2012

Photos forgotten

I completely forgot I took these about a month ago.

 When I was small and visiting my Grandparents, I remember going into their basement to hangout with my uncle Dennis while he was repairing TV's and radios he found tossed away. He had an oscilloscope, packs of resistors, vacuum tubes, transistors, probably everything Radio Shack would have in stock, hanging on pegs. So here's a place for him, at the end of Ice Ave across from the contractors yard.
I put a TV antenna on the roof ( he's gotta be able to tests those TV's), you can see it if you look close.
The cars are significant too, my Dad had a 1975 AMC Pacer, and my uncle had a 1965 ( I think) Galaxy 500. Only the colors aren't right, O well...

Saturday, April 14, 2012

Lots of little things

I haven't posted in a while and Randy called me asking what I was doing, so here is a little of what I've been working on.


Above is the hull of a Walthers Tugboat. Per an article in the publication "Transfer" by George Barrett, I have elected to increase the freeboard  the front of the hull. I did this by gluing a block of balsa wood to the bottom and shaving off what I didn't want. Then I coated it with automotive bondo, sanded it and here is the result. Next for this model are new rubbing strakes and the large plate used to mount the bow fender. This will be a model of the Lehigh Valley tug Bethlehem and she had what looks to be a series of rubber tubes for the bow fender. After that is the 'H' bits and deckhouse.
More photos to follow.


 Next is some of the piping that I'm working on for the fuel oil unloading track at the Powerhouse. There will be three valve assemblies for the three tank car spots. The Tichy walkway will have a railing opposite the pipes. All this has to fit between the Powerhouse siding and the main factory lead which is also 1/2" lower.


Lastly is a Lone Star Models truck trailer kit with its first coating of weathering. I'll take another photo with each additional coat to show the progression.


Saturday, February 25, 2012

The Contractors Yard # 2

I completed the fencing along the tracks as well as the remains of the abandoned coal bins. I still have to add some decking on the coal bins, some construction materials stored in the bins and a chain link gate. The construction materials will probably be added as I come across things I think will work. The graffiti I made my self referring to Internet images I found. I just used very fine pens to draw on the fences and wall.


 If I had some good urban images on the backdrop, the scene above would be great.
 I still have to add some tall grasses and weeds along the wood fence, and I'm thinking of a light pole (working of course) just behind the storage trailer.
This image shows that I still some weathering to do on the tracks. I'll have to fire up the airbrush for that part.

Sunday, February 12, 2012

The Contractors yard

I'm finally making some headway on the ex Coal and Ice distributor which is now a construction contractor. I started building a fence from scrap freight car parts and will finish an ordinary wooden fence. I might make a chain link gate. I still need more junk but I'll add that after I finish adding weeds around the fence.


Tuesday, January 31, 2012

Module protection

After fixing the damage to the Yard Office I decided to finally truly protect the modules from my cat. I built some sides and a lid over the weekend. All this actually serves three purposes in addition to cat protection, the sides against the wall serve as backdrops, the top keeps a lot of cat fur and dust of the scenery and lastly the backdrops will be protection during transport. The front and top will stay home when I take the modules to events.

 The lids are blue foam board, I wanted something very light, The scraps I can use for future landforms.


In the image above you can see the wood brackets on top of the backdrop. These hold up the foam lids.

Good as new

Well maybe the post title is a bit deceiving, I don't model anything that looks new. As bad as it looked, the damage to the yard office was easily fixed. Only one piece of wood was broken and even then, it wasn't in two pieces. A little white glue fixed it. The rest was just reassembly of the stairs and platform.

I had added the TV antenna a few weeks ago. If you look closely you may see the TV cable from the antenna going into the window. The antenna is N-scale etched steel by Gold Medal Models.

Tuesday, January 24, 2012

Ouch!!

On Sunday last I notice that the model Yard office was lying on it side but still on the module. Upon closer examination I could see that my cat, (who will remain unnamed to protect the guilty) had apparantly launched herself up onto the module and landed on the wooden kit. For images from the structural autopsy see below.


The damage is only to the stairway and platform and I'm sure I can make repairs. Some parts will have to be completely replaced but the most important parts are intact. I may use this as an opporturity to individualize the structure a little with the rebuild.

At least she didn't damage the building.

MG

Monday, January 9, 2012

Yard office, before and after.

I had to delay continued work on the conrete plant complex because I needed to finish some scenery immediately around the yard office. Otherwise I might damage parts of the conveyor supports in the conrete plant complex while trying to reach the area around the yard office. So I dug out some of the Silflor grass I had been using and did some scenery. Now before I did this I needed to build up the foundation of the office structure first. I want all the structures to have foundations that are recessed into the scenery. This way they don't look like they are resting on top of the scenery.


The image above shows the foam scenery base cut away for the structure foundation to recess into. The black and red object is a tab accuated wire quick connect to the lighting harness. I just push on each tab an slip in a wire from the 14v bulb I have mounted in the structure. This is the first time I've tried this devise so the jury is still out.


Before

After.
I am very please with this Silflor stuff, if you haven't tried it yet, go get one of the small starter packs.
The working time between the two previous images to add the grasses is about 15 min. Note: The concrete wall was already in place.